

Most new RVs come with an RV starter kit that includes the most obvious supplies you’ll need for your first trip, like a water hose, bubble level, standard sewage hose, and power cord.
However, while these supplies will get you through your first trip, you’ll want to purchase a few more critical supplies by the time you’re on your second or third trip that will make your trip safer and more comfortable.
Here are are recommendations for the products you’ll need. We’ve tested each of these products on our own travel trailer.
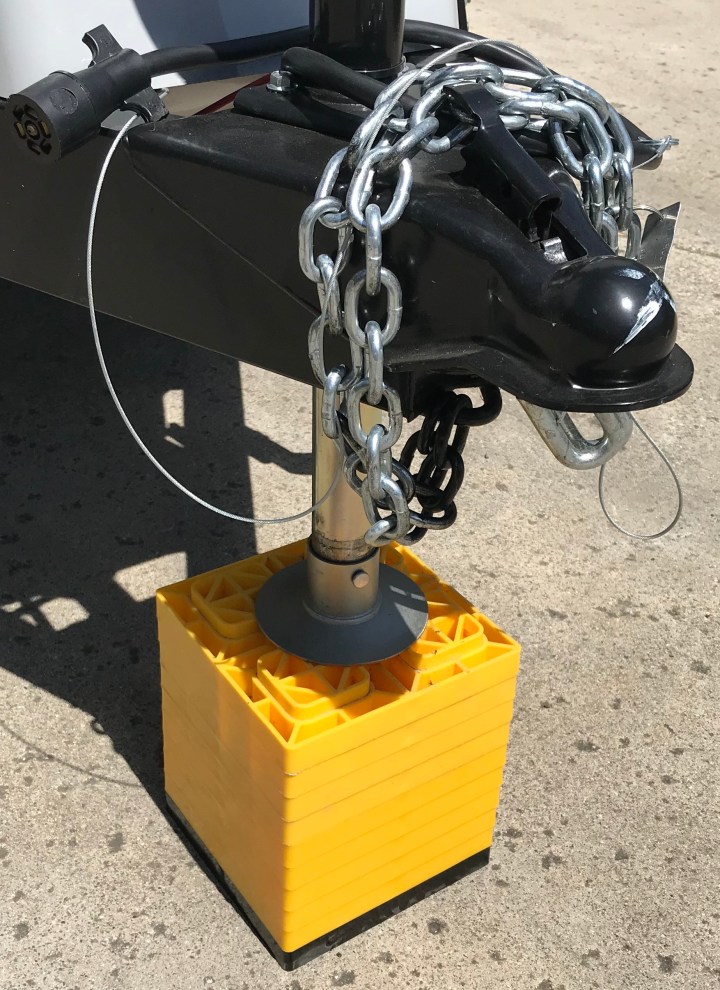
1. Wheel Chocks

Use wheel chocks to keep your travel trailer from moving, particularly while you’re unhitching from your vehicle or hitching back up. The wheel chocks are placed securely in front of and behind each tire. If you think about lifting up the front of your trailer with the jack, without wheel chocks, there is nothing to keep your trailer from rolling backwards. Wheel chocks also help keep your trailer more stable while you are moving around in it.
We recommend getting the kind with an attached rope, since they can get really jammed behind the tires. Any will do, but after trying three different types of chocks we’ve settled on the Camco wheel chock with rope. They are durable, inexpensive, brightly colored (we have red), and have attached ropes for easy removal.
2. Water Filter

Conventional wisdom among most experienced RVers is that the quality of water from RV park water hookups varies widely. The water can contain sediment (as we found out after a few months in our first trailer when our faucet got clogged with sediment), or can have odd smells.
Ideally, you’d like to be able to filter out most of these problems before they get into your RV’s internal water pipes. Your welcome kit probably came with a freshwater hose and regulator. The regulator doesn’t filter the water; it reduced the higher pressure of the city water connection to a level that your RV’s internal plumbing can safely tolerate.
Most RV water filters are quickly and easily attached between the water connection and your city water connection so that water is filtered before it inters your trailer. The quality of water filters varies widely but any filter is better than none. Even the lowest-cost filter will filter the sediment and other impurities down to 20 microns, and typically lasts for a few months of camping, as long as you make sure you let the water drain from the filter when you leave camp so that water does not sit in the filter.
We’re prepared a detailed evaluation of the best RV water filters, and we recommend the Camco TastePURE RV/Marine water filter (about $17), which includes the hose protector you’ll need to hook it up the first time.
3. Small Toolkit
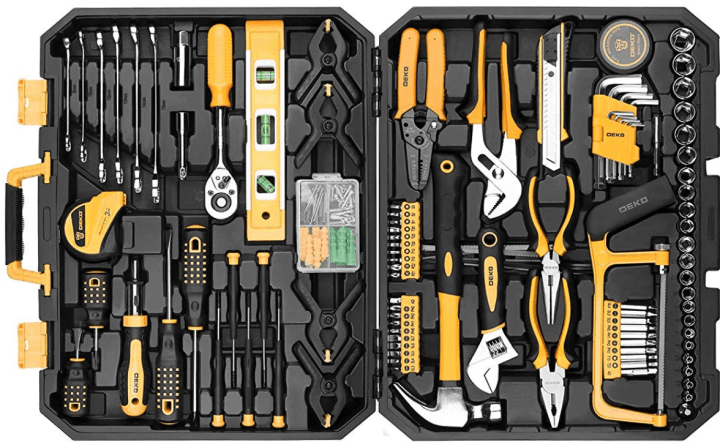
Travel trailers are basically moving houses, and things can (and often do) go wrong. Most of the problems you encounter can be relatively easily fixed, but only if you have the right tools. On our early trips, we would have to rely on experienced campers around us when we needed certain tools that we weren’t carrying.
Purchasing a small toolkit of commonly-used tools is an excellent investment to be prepared for whatever might happen on the road. Your tool kit should at a minimum screwdrivers, an adjustable wrench, a hammer, pliers, and a socket set. We recommend getting a kit that comes in a storage case so it’s easy to store and keep track of your tools.
After trying out three toolkits, we really like the DekoPro 168-Piece Socket Wrench Auto Repair Tool Combination Package which comes in a sturdy, organized plastic case. It’s a bit pricier than two earlier kits that we tried that were missing key tools and lower-quality tools, but still more affordable than some of the name brands, but the tools feel good quality. This kit includes 4 small nylon spring clamps (surprisingly useful), a level (good for leveling your trailer), and nearly every possible size of screwdriver.
4. Leveling Blocks
Leveling blocks are used for three primary purposes on travel trailers. The first is to save effort and time when you are lowering your hitch using the manual or electric jack that hoists the front of the trailer up or down. The second is to level your trailer when you are parking on an uneven surface by driving the trailer wheels up on to several blocks. The third is to put under the leveling jacks to keep them from sinking into mud and getting wet, rusty and muddy; blocks are much easier to wash off that the leveling jacks.
Some old-school RVers prefer to use wood blocks. We also started off using 10″x 2″ wood blocks we had in our garage, but storing them was challenging, particularly when they were used in wet or muddy conditions.
We selected the Camco Fasten 2×2 Leveling blocks. They are durable, highly visible, and we appreciated the T-handle that keeps them well-organized. In some challengingly-uneven campsites, we found that we needed more than one set, so we ended up buying a second set as well.
5. High Quality Level

Many trailer welcome kits come with a bubble level. The several we’ve seen are low quality, and it’s actually hard to properly level your trailer front to back and side to side accurately. You often don’t realize that the trailer isn’t quite level until you start walking around in your trailer or try to cook an egg.
We’ve also tried using the iPhone level app called “Measure”, which seems like it would be the perfect solution for leveling. However, we found it as equally unreliable as the bubble level for correctly leveling the trailer. It’s likely the iPhone level is only accurate to about 1 degree, while a torpedo level should be accurate to a fraction of a degree.
A higher quality level is easier to read, and far more accurate. The conventional wisdom is first to level the trailer side to side (if one side is too low, you can drive the wheels up onto a leveling block). We take a measurement using the trailer floor just inside the front door, but without getting into the trailer. Next, we level the trailer front to back using the jack. We’ve found that the higher quality level allows us get the leveling right on the first try. (If you purchase the DekoPro 168-Piece Socket Wrench Auto Repair Tool Combination Package, it contains a high-quality level you can use.)
6. Shoe Mat & Entry Rug

Trying to keep dirt from getting into your trailer can be challenging, especially when you have kids having a good time. An exterior mat of some kind is useful both for helping get debris off shoes before you come inside, but also to have a place to keep your shoes outside the trailer.
We tried out a variety of mats, and standardized on two different types. One is a larger woven polypropylene matt that is 9×12 feet. We use this when we’re on a dusty surface or grass, and can affix it to the ground with tent stakes using the loops on the sides so it doesn’t blow away. This is a great solution if you’ll be in a place for a few days. This model folds easily and fits neatly into a carrying case.
The other option is a smaller mat that we toss down in front of the trailer stairs if we’re just in place for a day or two, or if we’re on a surface (like concrete) where we can’t put down a larger mat. We typically carry both with us and decide when we arrive which we will use.
Buy on Amazon: Larger Outdoor Polypropylene Mat
Buy on Amazon: Outdoor Welcome Mat
We hope these six supplies will help you on on your next trip. Travel smart; live better.